3D游戏编程与设计4——游戏对象与图形基础
文章目录
1. 基本操作演练【建议做】
(1)下载 Fantasy Skybox FREE,构建自己的游戏场景
i.下载
要下载导入Fantasy Skybox FREE,要实行如下步骤:
- 首先要打开Unity资源商店购买资源,当然Fantasy Skybox FREE资源是免费购买的,具体进入资源商店的方式有两种:
a. 直接在Unity工作界面中打开资源商店视图(菜单栏Windows->Assets Store,或者直接按Ctrl+9)
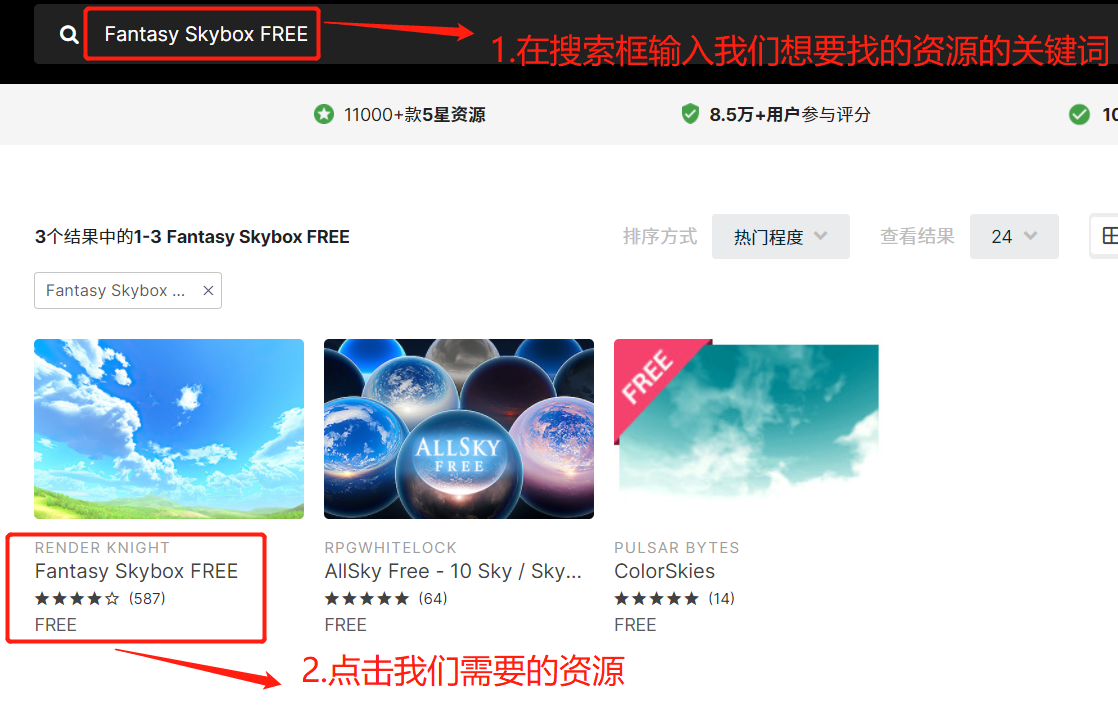
b. 打开浏览器,进入Unity资源商店官网(https://assetstore.unity.com),登录账户。 - 进入资源商店后,在搜索栏中输入Fanta Skybox FREE;
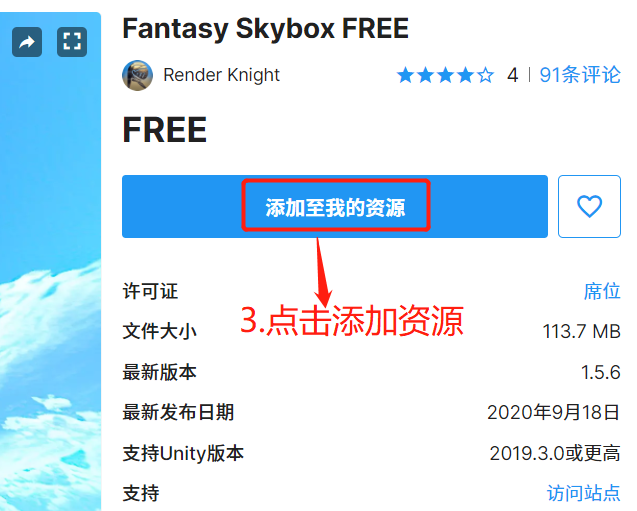
- 点击进入详情后点击“添加至我的资源”
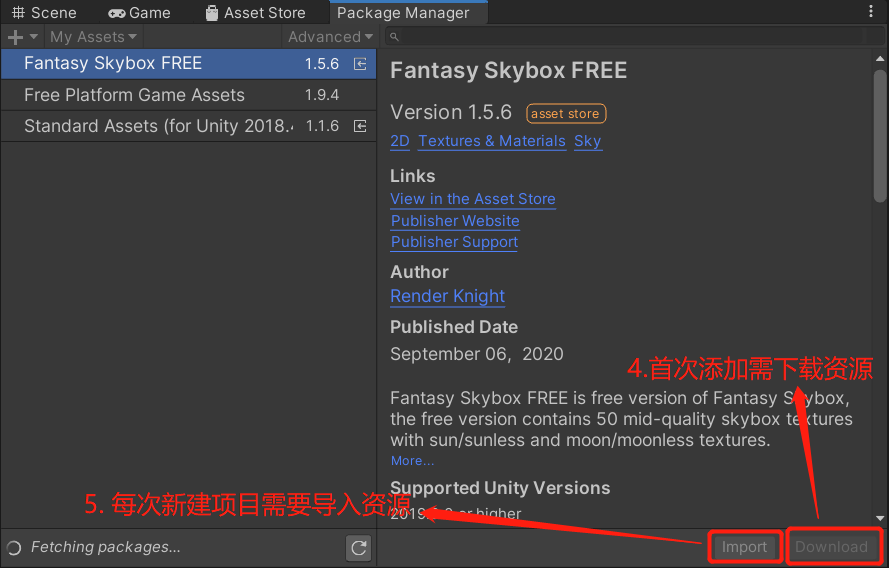
- 在自己的Unity工作界面中进入Package Manager界面,找到我们刚才添加的资源:
a. 如果第一次使用的话需要将其从网络上下载下来
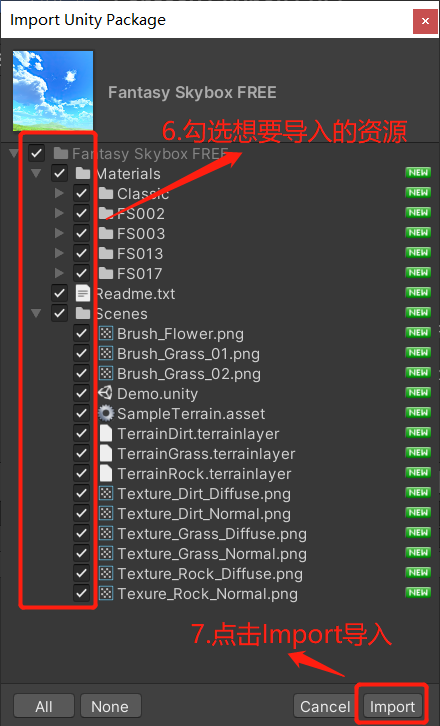
b. 之后在不同项目中只需要点击Import,根据需要选择想要导入的资源即可(本示例中我们选择下载该资源包中的所有内容)。

ii.构建游戏场景
下载完资源包后,我们即可利用我们下载的资源包构建游戏场景。
创建Skybox
a.在Assets窗口右键创建新的Material,将其重命名为MySky;
b.在Inspector视图窗口中更改Shader类型为Skybox/Panoramic;
c.更改Spherical(HDR)的贴图:点击右侧的方框,在弹出的窗口中选择自己想要的贴图。
d.最后将修改好的天空盒拖入视图,即可加载。
创建地形Terrain
创建完天空盒后我们可以开始建立地形,具体操作方法为:
a. 在Hierarchy窗口右键新建3D Object/Terrain,在Inspector窗口中调整它的位置及形状属性。
b. 在Inspector窗口中的Terrain组件中有5个选项,我们首先点击第2个(Paint Terrain)选项,使用Paint Terrain的Raise or Lower Terrain/Paint Holes/Set Height/Smooth Height这几种功能更改地形,初步效果如下:
c. 然后继续使用Paint Terrain的Paint Texture功能为整个地形添加底层的贴图。我们点击Edit Terrain Layers->Create Layer,从弹开的窗口中选择Texture_Grass_Diffuse添加草皮贴图,第一个添加的层默认会填充整个地图,后续添加的则需要用画刷手动图画。

(2)写一个简单的总结,总结游戏对象的使用
在Unity3D中有多种基本的游戏对象,比如Camera、Light、3D Object(如Cube、Sphere、Cylinder等)、Audio、Video、空对象等。
这些游戏对象可以直接在Hierarchy视图中右键点击创建,创建完后我们可以在Inspector视图中修改它们的属性,也可以为它们添加像碰撞器、刚体等组件添加效果。
同时,这些对象本身都有着各自固有的组件,可帮助我们实现一些特殊的功能:
- Camera: 摄像头,可以帮我们从某个角度观察场景;
- Light:可为场景添加平行光、点光源等光影效果,使物体渲染效果更好
- 空对象:只有基本的Transform组件,通常用来附加脚本组件实现脚本控制
- 3D Object:具有常见的几何形状,是常用的几何实体。
2. 编程实践——牧师与魔鬼 动作分离版
设计一个裁判类,当游戏达到结束条件时,通知场景控制器游戏结束
上次牧师与魔鬼普通版:传送门
本次实验其实是对上次编程实践中内容的修改,并未涉及到UI的改动,因此执行gif是一样的,如下:
游戏成功:

游戏失败:

gitee仓库的源代码链接
(1) 动作分离

在本章中,我们学习了动作管理器的设计,将动作从游戏场景中分离出来,而我们上次设计中游戏对象的动作就是对象的移动,具体实现位于Move.cs和MoveController.cs文件中,仿照课堂上所学我们进行改名CCMoveToAction.cs和CCActionManager.cs文件并进行相应修改,除此之外我们还仿照课程所学添加了若干文件(其中前面4个的代码内容直接照课堂所讲编写),具体各文件代码如下:
a.SSAction.cs
此文件内容直接照课堂上所讲内容进行编写,它的主要作用是作为所有动作的基类,SSAction继承自ScriptableObject,是不需要绑定GameObject类型对象的可编程类,直接由Unity引擎场景管理。
在该类中有若干属性,首先是bool类型的enable和destroy变量,分别用于指示该动作是否正在执行以及该动作是否应该被销毁。然后就是GameObject和Transform(通常是GameObject对应的transform组件),用于说明事件发生的对象。最后就是ISSActionCallback接口的实现,用于确定回调函数,实现游戏内的通信。
具体代码如下:1
2
3
4
5
6
7
8
9
10
11
12
13
14
15
16
17
18
19
20
21
22
23
24using UnityEngine;
public class SSAction : ScriptableObject
{
public bool enable = true;
public bool destory = false;
public GameObject gameobject { get; set; }
public Transform transform { get; set; }
public ISSActionCallback callback { get; set; } // Use this to achieve message notification(out of the control of the actionManager)
// Protected:Avoid users new abstract object
protected SSAction() { }
// Use this for initialize
public virtual void Start(){
throw new System.NotImplementedException();
}
// Updated is called once per frame
public virtual void Update(){
throw new System.NotImplementedException();
}
}
b.SSActionManager.cs
SSActionManager类将所有的动作都组合在一起,实现了动作的基本管理。
- 该类声明了3个私有变量存储数据:
- 首先是字典类型变量actions:用于为当前所有的动作添加数字引用标记,这样我们后面在用list存储待删除文件的时候就可以直接用对应数字记录,减少内存使用。
- 然后是存储SSAction的List类型变量waitingAdd:是我们新添加的动作的集合。
- 最后是存储int的List变量waitingDelete:存储着我们动作管理器集合中所有需要删除的动作的标号。
- 在Update方法中,每次都先将waitingAdd中的对象加进字典中;然后遍历字典,将其中destroy属性为true的动作加入waitingDelete集合中,剩下的动作就继续更新;最后将waitingDelete中对应的动作执行回收。
- 对于最后的public方法RunAction,它的作用在于将动作绑定游戏对象以及对应事件消息的接收方,然后将动作加进waitingAdd集合中。
1
2
3
4
5
6
7
8
9
10
11
12
13
14
15
16
17
18
19
20
21
22
23
24
25
26
27
28
29
30
31
32
33
34
35
36
37
38
39
40
41
42
43
44
45using System.Collections.Generic;
using UnityEngine;
public class SSActionManager : MonoBehaviour
{
private Dictionary<int, SSAction> actions = new Dictionary<int, SSAction>();
private List<SSAction> waitingAdd = new List<SSAction>();
private List<int> waitingDelete = new List<int>();
// Update is called once per frame
void Update()
{
foreach (SSAction ac in waitingAdd) actions[ac.GetInstanceID()] = ac;
waitingAdd.Clear();
// Update each action's status
foreach (KeyValuePair<int, SSAction> kv in actions) {
SSAction ac = kv.Value;
if (ac.destory) {
waitingDelete.Add(ac.GetInstanceID());
} else {
ac.Update();
}
}
// Destory the item actions in the waitingDelete List
foreach(int key in waitingDelete) {
SSAction ac = actions[key];
actions.Remove(key);
Object.Destroy(ac);
}
waitingDelete.Clear();
}
public void RunAction(GameObject gameobject, SSAction action, ISSActionCallback manager) {
action.gameobject = gameobject;
action.transform = gameobject.transform;
action.callback = manager;
waitingAdd.Add(action);
action.Start();
}
// Start is called before the first frame update
protected void Start() { }
}
c.ISSActionCallback.cs
该接口用于在动作完成时调用此接口发送消息给管理者,从而处理下一个动作,像我们后面的CCActionManager和CCSequenceAction这两个类都需要实现此接口,1
2
3
4
5
6
7
8
9public enum SSActionEventType : int { Started, Competeted }
public interface ISSActionCallback {
void SSActionEvent(SSAction source,
SSActionEventType events = SSActionEventType.Competeted,
int intParam = 0,
string strParam = null,
object objectParam = null);
}
d.CCSequenceAction.cs
该类是一个动作组合类,由于每次操作我们可能需要完成的动作不只一个(比如我们在移动人物的时候就需要移动两次),这时就需要将动作收集成一个动作序列。
该类继承了SSAction类,在GetSSAction中创建了一组动作序列。另外本身还具有一个SSAction组成的List类型变量sequence,存储待执行的动作组合,在Update中会遍历整个sequence,按顺序执行动作。在动作序列执行开始时(即Start()函数),我们需要为序列中的每个动作添加对应执行的动作对象。
该类还实现了ISSActionCallback接口,关于该接口中的SSActionEvent()方法,我们采用的实现方法是当该动作序列中的某个小动作完成后,它就需要通知该序列类,执行序列中下一个动作。另外要根据repeat属性决定后续操作:repeat值非零则说明需要重新遍历sequence中的动作,当前动作不销毁(destroy设为false);否则就设置销毁动作,并当遍历至sequence时结尾时减少repeat值重新遍历序列。1
2
3
4
5
6
7
8
9
10
11
12
13
14
15
16
17
18
19
20
21
22
23
24
25
26
27
28
29
30
31
32
33
34
35
36
37
38
39
40
41
42
43
44
45
46
47
48
49
50
51
52
53
54
55
56
57
58
59
60
61
62
63
64using System.Collections.Generic;
using UnityEngine;
public class CCSequenceAction : SSAction, ISSActionCallback
{
public List<SSAction> sequence;
public int repeat = -1; // repeat forever
public int start = 0;
public static CCSequenceAction GetSSAction(int repeat, int start, List<SSAction> sequence)
{
CCSequenceAction action = ScriptableObject.CreateInstance<CCSequenceAction>();
action.repeat = repeat;
action.sequence = sequence;
action.start = start;
return action;
}
// Update is called once per frame
public override void Update()
{
if (sequence.Count == 0) return;
if (start < sequence.Count)
{
sequence[start].Update();
}
}
public void SSActionEvent(SSAction source,
SSActionEventType events = SSActionEventType.Competeted,
int intParam = 0,
string strParam = null,
object objectParam = null)
{
source.destory = false;
this.start++;
if (this.start >= sequence.Count)
{
this.start = 0;
if (repeat > 0) repeat--;
if (repeat == 0)
{
this.destory = true;
this.callback.SSActionEvent(this);
}
}
}
public override void Start()
{
foreach (SSAction action in sequence)
{
action.gameobject = this.gameobject;
action.transform = this.transform;
action.callback = this;
action.Start();
}
}
void OnDestroy() {
//TODO: something
}
}
e.CCMoveToAction.cs
该类是原来普通版的Move.cs改动而来,主要实现的功能就是实现将对象以某个速度值往目标位置移动。由于只需要在Update中实现单个直线移动,而我们原来Move.cs中完成的是一个”折线”运动,因此我们需要简化移动逻辑的代码,具体的多次移动逻辑我们会移到后面的CCActionManager.cs。1
2
3
4
5
6
7
8
9
10
11
12
13
14
15
16
17
18
19
20
21
22
23
24
25
26
27
28
29
30
31using UnityEngine;
public class CCMoveToAction : SSAction
{
public Vector3 target;
public float speed;
public static CCMoveToAction GetSSAction(Vector3 target, float speed)
{
CCMoveToAction action = ScriptableObject.CreateInstance<CCMoveToAction>();
action.target = target;
action.speed = speed;
return action;
}
public override void Update()
{
// Check whether reach target
if (this.gameobject == null || this.transform.localPosition == target)
{
this.destory = true;
this.callback.SSActionEvent(this);
}
else
{
this.transform.localPosition = Vector3.MoveTowards(this.transform.localPosition, target, speed * Time.deltaTime);
}
}
public override void Start() { }
}
f.CCActionManager.cs
我们将原先MoveController和FirstSceneController中的MoveBoat()、MoveRole()的逻辑抽离出来形成该类。前面我们提到人物的移动需要是一个“折线”,因此应该是两个直线运动的组合;而船的移动只需要一次直线运动即可。另外要注意的是isMoving这个属性要保留,以保证一次只有一个对象能移动,具体在移动对象时设为true,回调时设为false。
因此我们能够给出最后整个动作管理器的代码如下:1
2
3
4
5
6
7
8
9
10
11
12
13
14
15
16
17
18
19
20
21
22
23
24
25
26
27
28
29
30
31
32
33
34
35
36
37
38
39
40
41
42
43
44
45
46
47using System.Collections.Generic;
using UnityEngine;
public class CCActionManager : SSActionManager, ISSActionCallback
{
public FirstSceneController sceneController;
public CCMoveToAction boatMovement;
public CCSequenceAction RoleMovement;
private bool isMoving = false;
public bool checkIsMoving() { return this.isMoving; }
protected new void Start()
{
sceneController = (FirstSceneController)SSDirector.getInstance().currentSceneController;
sceneController.actionManager = this;
isMoving = false;
}
// MoveBoat
public void MoveBoat(GameObject boat, Vector3 target, float speed)
{
if (isMoving) return;
isMoving = true;
boatMovement = CCMoveToAction.GetSSAction(target, speed);
this.RunAction(boat, boatMovement, this);
}
public void MoveRole(GameObject role, Vector3 transit, Vector3 target, float speed)
{
if (isMoving) return;
isMoving = true;
SSAction action1 = CCMoveToAction.GetSSAction(transit, speed);
SSAction action2 = CCMoveToAction.GetSSAction(target, speed);
RoleMovement = CCSequenceAction.GetSSAction(0, 0, new List<SSAction> { action1, action2 });
this.RunAction(role, RoleMovement, this);
}
public void SSActionEvent(SSAction source,
SSActionEventType events = SSActionEventType.Competeted,
int intParam = 0,
string strParam = null,
object objectParam = null)
{
isMoving = false;
}
}
(2) 裁判类
裁判类的逻辑其实很简单,就是将之前原本FirstSceneController中的Check()逻辑抽出来形成新的类,具体代码如下:1
2
3
4
5
6
7
8
9
10
11
12
13
14
15
16
17
18
19
20
21
22
23
24
25
26
27
28
29
30
31
32
33
34
35
36
37
38
39
40
41
42
43
44
45
46
47
48
49
50
51
52
53using UnityEngine;
public class JudgeController : MonoBehaviour
{
CoastModel leftCoast;
CoastModel rightCoast;
BoatModel boatModel;
public FirstSceneController sceneController;
public void Start()
{
sceneController = (FirstSceneController)SSDirector.getInstance().currentSceneController;
}
public void Update()
{
leftCoast = sceneController.leftCoast.GetCoastModel();
rightCoast = sceneController.rightCoast.GetCoastModel();
boatModel = sceneController.boatController.GetBoatModel();
if (!sceneController.isRunning) return;
if (sceneController.time <= 0)
{
sceneController.callBack("YOU LOSE", false);
return;
}
this.gameObject.GetComponent<UserGUI>().statusMessage = "";
// Game Success
if (leftCoast.priestNum == 3 && leftCoast.devilNum == 3) { sceneController.callBack("YOU WIN", false); }
else
{
int leftPriestCnt, leftDevilCnt, rightPriestCnt, rightDevilCnt;
// Role Number calculate
leftPriestCnt = leftCoast.priestNum;
leftDevilCnt = leftCoast.devilNum;
if (!boatModel.isRight)
{
leftPriestCnt += boatModel.priestNum;
leftDevilCnt += boatModel.devilNum;
}
rightPriestCnt = 3 - leftPriestCnt;
rightDevilCnt = 3 - leftDevilCnt;
// Game Fail Check
if ((leftDevilCnt > leftPriestCnt && leftPriestCnt != 0) ||
(rightDevilCnt > rightPriestCnt && rightPriestCnt != 0))
{
sceneController.callBack("YOU LOSE", false);
}
}
}
}
(3) 场记修改——FirstSceneController.cs
由于前面我们单独整理出了一个CCActionManager用于管理动作,还将Check()的逻辑抽出来单独作为裁判类,因此我们场记的管理内容也需要进行修改,需要加上裁判类和CCActionManager的控制,最后修改后代码如下:1
2
3
4
5
6
7
8
9
10
11
12
13
14
15
16
17
18
19
20
21
22
23
24
25
26
27
28
29
30
31
32
33
34
35
36
37
38
39
40
41
42
43
44
45
46
47
48
49
50
51
52
53
54
55
56
57
58
59
60
61
62
63
64
65
66
67
68
69
70
71
72
73
74
75
76
77
78
79
80
81
82
83
84
85
86
87
88
89
90
91
92
93
94
95
96
97
98
99
100
101
102
103
104
105
106
107
108
109
110
111
112
113
114
115
116
117
118
119
120
121
122
123
124
125
126
127
128
129
130
131
132
133
134
135
136
137
138
139
140
141
142
143
144
145
146
147
148
149
150
151
152
153
154
155
156
157
158
159using UnityEngine;
public class FirstSceneController : MonoBehaviour, ISceneController, IUserAction
{
public CCActionManager actionManager;
public CoastController leftCoast, rightCoast;
public BoatController boatController;
private RoleController[] roleControllers;
private RiverModel riverModel;
// Status
public bool isRunning;
public float time;
private float speed = 5;
// the first scripts
void Awake()
{
SSDirector director = SSDirector.getInstance();
director.currentSceneController = this;
LoadResources();
this.gameObject.AddComponent<UserGUI>();
this.gameObject.AddComponent<JudgeController>();
this.gameObject.AddComponent<CCActionManager>();
}
void Update()
{
if (isRunning)
{
time -= Time.deltaTime;
this.gameObject.GetComponent<UserGUI>().time = (int)time;
}
}
// Use for JudgeController CallBack and display message in GUI
public void callBack(string message, bool isRunning)
{
this.gameObject.GetComponent<UserGUI>().time = (time > 0) ? (int)time : 0;
this.gameObject.GetComponent<UserGUI>().statusMessage = message;
this.isRunning = isRunning;
}
// loading resources for the first scence
public void LoadResources()
{
// Create Coast
leftCoast = new CoastController();
rightCoast = new CoastController();
leftCoast.CreateCoast("leftCoast", Position.leftCoast);
rightCoast.CreateCoast("rightCoast", Position.rightCoast);
// Create River
riverModel = new RiverModel(Position.river);
// Create Boat
boatController = new BoatController();
boatController.CreateBoat(Position.rightBoat);
// Create Roles
roleControllers = new RoleController[6];
for (int i = 0; i < 6; ++i)
{
roleControllers[i] = new RoleController();
roleControllers[i].CreateRole(Position.coastRole[i], i < 3, i);
}
// Add roles to rightCoast
for (int i = 0; i < 6; ++i)
{
roleControllers[i].GetRoleModel().role.transform.localPosition = rightCoast.AddRole(roleControllers[i].GetRoleModel());
}
isRunning = true;
time = 60;
}
public void Pause()
{
isRunning = !isRunning;
}
public void Restart()
{
// Create Coast
leftCoast.CreateCoast("leftCoast", Position.leftCoast);
rightCoast.CreateCoast("rightCoast", Position.rightCoast);
// Create Boat
boatController.CreateBoat(Position.rightBoat);
// Create Roles
for (int i = 0; i < 6; ++i)
{
roleControllers[i].CreateRole(Position.coastRole[i], i < 3, i);
roleControllers[i].GetRoleModel().role.transform.position =
rightCoast.AddRole(roleControllers[i].GetRoleModel());
// Add roles to rightCoast
roleControllers[i].GetRoleModel().role.transform.localPosition = rightCoast.AddRole(roleControllers[i].GetRoleModel());
}
isRunning = true;
time = 60;
}
// MoveBoat
public void MoveBoat()
{
if (!isRunning || actionManager.checkIsMoving()) return;
Vector3 target = boatController.GetBoatModel().isRight ? Position.leftBoat : Position.rightBoat;
actionManager.MoveBoat(boatController.GetBoatModel().boat, target, speed);
// Change the status of the boat and roles
boatController.GetBoatModel().isRight = !boatController.GetBoatModel().isRight;
}
public void MoveRole(RoleModel roleModel)
{
Vector3 target;
if (!isRunning || actionManager.checkIsMoving()) return;
if (roleModel.isInBoat)
{
// Boat to Coast
if (boatController.GetBoatModel().isRight)
target = rightCoast.AddRole(roleModel);
else
target = leftCoast.AddRole(roleModel);
// Transit position
Vector3 transitPos;
if (roleModel.role.transform.localPosition.y > target.y)
transitPos = new Vector3(target.x, roleModel.role.transform.localPosition.y, target.z);
else
transitPos = new Vector3(roleModel.role.transform.localPosition.x, target.y, roleModel.role.transform.localPosition.z);
actionManager.MoveRole(roleModel.role, transitPos, target, speed);
roleModel.isRight = boatController.GetBoatModel().isRight;
boatController.RemoveRole(roleModel);
}
else
{
// Coast to Boat
if (boatController.GetBoatModel().isRight == roleModel.isRight)
{
if (roleModel.isRight) rightCoast.RemoveRole(roleModel);
else leftCoast.RemoveRole(roleModel);
target = boatController.AddRole(roleModel);
// Transit position
Vector3 transitPos;
if (roleModel.role.transform.localPosition.y > target.y)
transitPos = new Vector3(target.x, roleModel.role.transform.localPosition.y, target.z);
else
transitPos = new Vector3(roleModel.role.transform.localPosition.x, target.y, roleModel.role.transform.localPosition.z);
actionManager.MoveRole(roleModel.role, transitPos, target, speed);
}
}
}
}
3. 心得
这次实验其实整体上来说比较简单,任务一的下载天空盒和构建任务场景我们在课上已经做过,所以其实比较容易;而编程实践中其实就是将之前做过的Move给更加细致化,另外将裁判类单独移出来,这些其实也都比较容易,而且大部分要添加的代码课堂讲义中也都有贴出图片,因此作业也还是比较轻松的。